My Tuscan Inspired Kitchen: Painted Cabinets and New Hardware
As an Amazon Associate and member of other affiliate programs, I earn from qualifying purchases.
My kitchen cabinets are painted! What a difference updated painted cabinets make to the overall ambiance in a kitchen.

Welcome to Week 7 of the One Room Challenge! This is the week where you start to panic. The big reveal is next week. What details did I forget? Will I get all of the little seemingly insignificant projects finished? This is my first ORC so I really am just learning the ropes. I planned out my weekly projects but if you’ve been following along, my cabinets were supposed to be the topic of Week 4. So, as with any project we must deal with unforeseen issues that cause delays. Fortunately, I’ve had enough small projects to keep me busy but these cabinets were a major project.
Our Original Cabinet Finish
I first painted my kitchen cabinets white about three years ago. Here is a picture of the original cabinets.
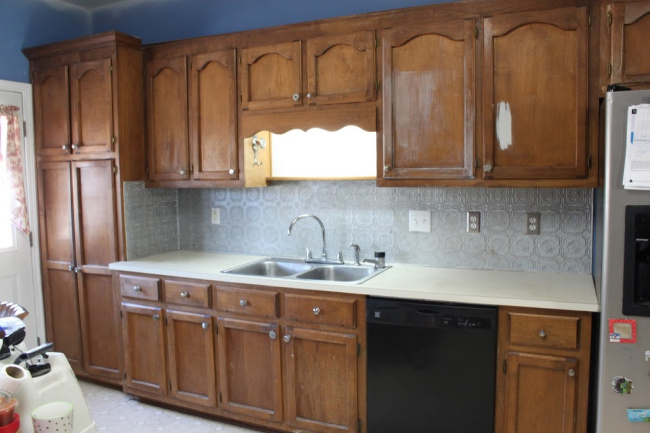
Mr. Blu wanted white cabinets. I thought he was crazy as we have a very large family. At the time, I still had my antique store so life was crazy and rushed. It seemed that white would be high maintenance in a time when I had no time for maintetance.
First Round of White Painted Cabinets
But, I went ahead and painted them white. And I loved it! Our kitchen was refreshed and renewed. But the paint I used was not ideal for a kitchen and over time there were chips and scratches and such, as you would expect.

This time around, I planned to use an oil based paint for my painted cabinets. I remember years ago as a little girl helping my Dad paint around our house. Pop was the original DIY master! Back in the day all he used was oil based enamel. When I was in 6th grade, I got to revamp my bedroom. It was the first time Pop really used latex paint. While it was easy to use, I could tell the difference from the oil based enamel that we had always used before. I it still is ingrained in my tough Irish mind that oil based paint is the most durable paint. And so, that’s what I decided to use on the kitchen.
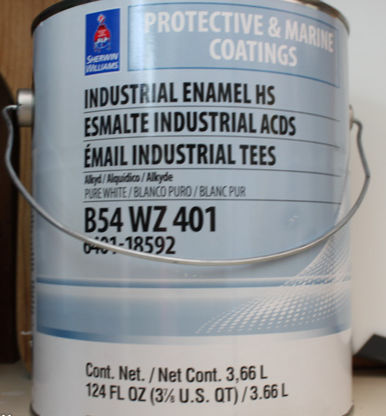
Surely industrial and marine grade oil based paint will hold up to the demands of a busy Edinger kitchen!
Using Oil Based Paint
Oil based paint needs an oil based primer. I had forgotten about the primer. A quick trip to our local Sherwin Williams store proved quite fruitful as I got to chat with one of their specialists. You must use an oil based primer with oil based paints for fresh wood that has never been painted and when painting over latex paint. I didn’t necessarily need the primer since I had used a mineral based product originally on my painted kitchen cabinets. However, I wanted this treatment to last a long long time. As with all important paint jobs, primer is a crucial step to preserving a good paint job. So, I bought the oil based primer.
With our new luxury vinyl planked floor already installed, I didn’t want to spray the cabinet built ins. The doors would be sprayed to achieve a fine finish. But the base cabinets would need to be hand brushed.
Help from Homeright
Homeright was kind enough to send me a Super Finish Max paint sprayer. Their Finish Max is my go to tool for painting furniture and even ceiling and walls when appropriate. Some time ago, they released their new Super Finish Max which was redesigned to reduce the need to thin your paint. I have never used a paint sprayer for oil based paint so I was excited to give it a try with my painted cabinets project.
The sprayer arrived with three different spray tips to use with different types of paint, stains, and polys. I called their customer service line just to make sure I had selected the correct tip for my oil based paint. Judy was quite helpful and concurred with my choice. So off I went to the driveway with my large Homeright spray shelter, my Super Finish Max sprayer, and 22 cabinet doors of varying sizes.
The Process
I set up a paint station inside of the shelter to maximize the number of doors I could paint at once.
The process consisted of:
- a light sanding to both sides of each door
- one coat of primer to the back of each door
- allow each door to dry completely
- repeat the previous three steps for the front of each door
Each coat of primer had a dry time of 2 hours. I was able to prime the all of the doors, front and back, in one day.
The next day I set up the Homeright Spray Shelter again. This paint needed 8 hours to dry. This drying window allowed so much room for error. It would be my luck that a windstorm or flock of fluffy birds would blow through the neighborhood leaving remnants of many undesirable things in the air to settle on my drying doors. So I repeated the process listed above but carried every door individually inside to dry. Believe me when I tell you that there is a definite art to balancing a horizontally carried wet painted cabinet door (like a pizza box) while trying to open the door all the while dodging the dog who reacts like you’ve been gone for three days every time you re-enter the house. That was 22 trips up the steps and into the spare bedroom where the doors could dry safe from bugs, stray leaves, pet hair, etc.
My plan was to spray the final coat on the back of the doors early in the morning. The paint would dry for 8 hours although I could probably allow 6 drying hours. This would allow me to paint the fronts starting around 6 PM and allow all of the doors to dry completely overnight. Um…that didn’t happen because I was exhausted from my spectacularly balanced 22+ trips up the steps coupled with the 90 degree Alabama weather. So instead, I hung out in the pool…with a cocktail!
I finished the doors the next day and allowed them another overnight drying session. It was time for re-installation! That mean…new hardware!
D.Lawless Hardware Sets the Standard
I met Derrick from D.Lawless Hardware at my very first Haven Conference in about 8 years ago. D.Lawless has the most extensive and beautiful selection of furniture hardware for just about any project. I had received several sets of hardware for projects over the past few years. You can see how beautiful hardware and embellishments can completely change the look of furniture Here and Here.
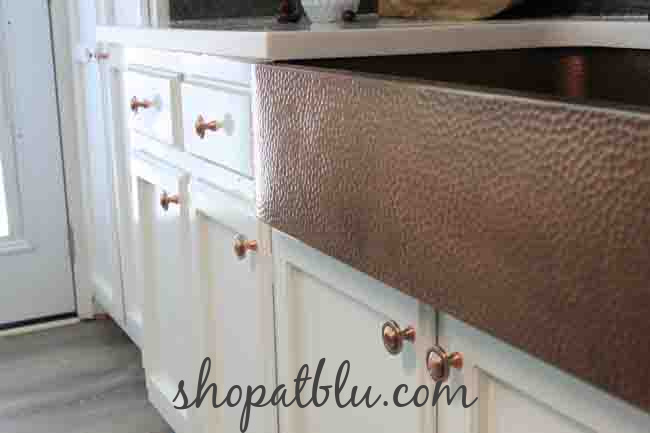
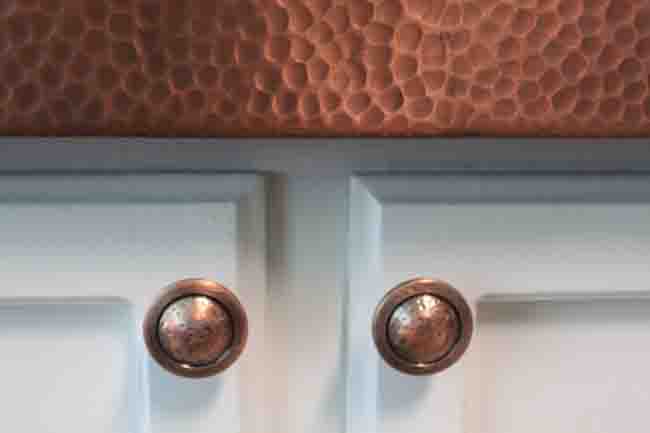
I wanted the new knobs to compliment my copper hammered farmhouse sink. And D.Lawless did not disappoint. I found the following knobs and ordered one of each so I could see them in the kitchen with the floors and the counters and the sink. All of the samples were beautiful but there was really only one that demanded to be installed. I’m sure you can guess which one I selected.
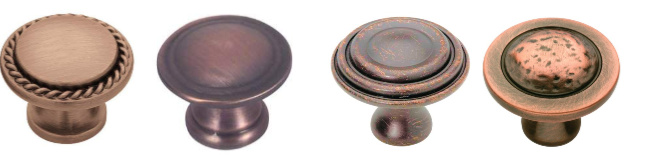
I also wanted to replace the gold hinges. Low and behold, D.Lawless has white hinges! So I emailed Derrick and asked if he would send me some hardware for my kitchen. He said of course! And just days later, I received my hammered copper knobs and white hinges!
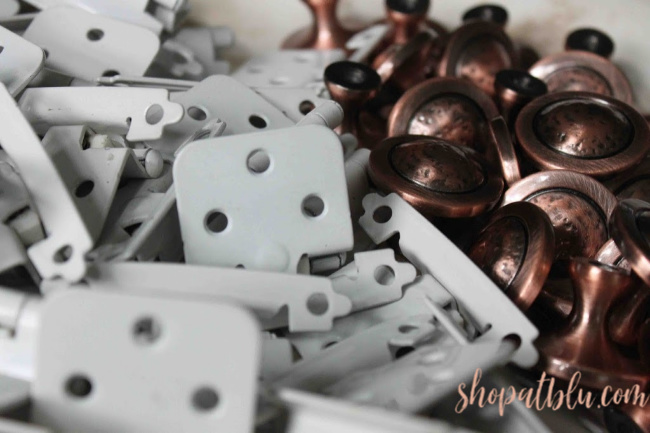
It took a little bit of balancing, maneuvering, and patience to reinstall the doors with the new hinges. The old hinge holes did not exactly fall in line with the holes in the new hinges. This wasn’t a big deal for the installation on the insides of the doors but I had to be more careful on the exposed portion of the hinges. I figured out a process and over the course of a two days I was able to install all of the doors.
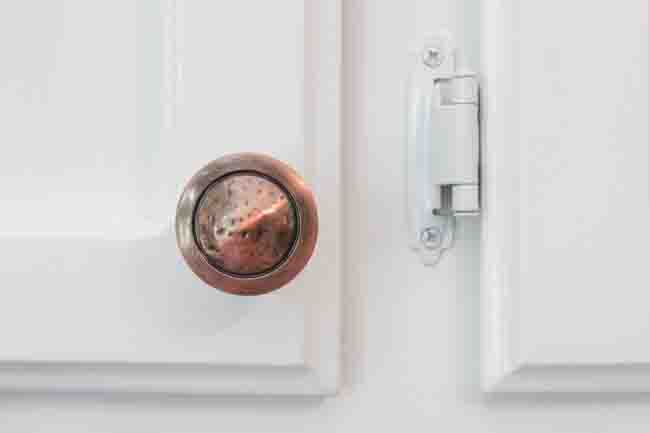
What a stunning difference! From the paint to the hinges to the gorgeous knobs! My kitchen is coming to life!
Easing into the Final Reveal
This next week will be spent completing those little annoying tasks that always get pushed to the end of a project. And there are always new small but important projects added as the primary projects have been completed. Things like painting the baseboards and the trim around the exterior door leading to our deck. I have a few small pieces of backsplash that need to be replaced. My kitchen is beautiful and refreshed! But our kitchen table needs a face lift because she really looks quite shabby in the shadow of the renovations. Same for a long MCM dresser that we use as a buffet and storage piece. So I’ll be working on these unplanned projects and finishing up the planned projects.
A special thank you to D.Lawless Hardware for providing this beautiful hardware and to Homeright for providing the Super Finish Max paint sprayer for this project. I am so very thankful to these two wonderful companies for their partnership!
See you next week for the final reveal!!!!


One Comment